Tag: Wordpress

Most useful WordPress plugins

Most useful WordPress plugins

Introduction

WordPress is no doubt the most popular framework for building a website. With WordPress, you can build a website from scratch within 5 minutes. If you are a WordPress beginner, the following plugins may help you get started even faster.

1. Insert Headers and Footers

Developed by WPBeginner

Insert headers and footers configuration screenshot

This plugin lets you insert JavaScript, meta tags, html tags, etc. in the header or footer of all pages in your website. While the concept is simple, this plugin becomes super handy when you want to add 3rd party services to your website via html or JavaScript.

Adding Google Analytics tracking script

If you don’t know it yet, Google Analytics is the best analytics tool out there for your website and what’s even better is it’s totally free. I believe almost every website in the world is integrated with Google Analytics. Therefore, I would highly recommend that you have your website integrated with this amazing tool.

When you want to integrate Google Analytics tracking script into your WordPress website, just copy the script provided by Google and paste it into the footer slot in the plugin configuration page. That’s it! Done! No additional plugin needed. No HTML editing needed. Your site is now fully integrated with Google Analytics.

Adding Webmasters Tools (Search Console) verification meta tag

While Webmasters Tools provide a lot of ways to verify your ownership of your website, the easiest way would be adding the verification meta tag to your website’s header. With Insert Headers and Footers plugin, it is as easy as copying and pasting the verification meta tag into the header slot in the plugin configuration page. Save the configuration and now you can go to Webmasters Tools and ask Google to verify your website.

Adding other 3rd party JavaScript

As your web building journey goes on, you will find yourself integrating a lot more 3rd party services to your website via JavaScript. In most of the cases, the 3rd party tells you to add a tracking script to the header or footer of every page in your website.

With this plugin installed, you just have to go to the plugin configuration page and add the new script to the existing other scripts that are already there. Oh! Did I forget to mention that you can add multiple scripts to the same slot (header or footer)? You can do that just by pasting the scripts one after another in the slot you want (header or footer). The whole slot’s content will be rendered into the html of every page in your website.

Header or footer?

In most of the cases, 3rd party scripts can be inserted into either header or footer and still work perfectly. However, whenever it’s possible, you should put the scripts in the footer because that will make your website load faster as your website will have a chance to render the content before loading the JavaScript.

2. Yoast SEO

Developed by Team Yoast

This plugin makes your SEO life a lot easier, especially if you are a beginner to SEO.

After this plugin is installed and activated, it will give you a configuration page with several tabs. The configurations are very easy to understand and the default settings are good enough, so you can just leave the default there and you’re good to go.

Now your website front-end already has the following features:

  • Auto generated meta description, social sharing meta tag (based on configured template),
  • Auto generated meta title (based on configured template),
  • Auto generated sitemap xml (default to yoursite/sitemap_index.xml).

And your back-end is provided with the following tools:

  • A dashboard on SEO performance,
  • Titles and Metas configurations,
  • Social platform integrations,
  • XML sitemaps configurations,
  • Robots.txt editor.

Yoast SEO also adds a form in your regular post editor, where it allows you to specify a keyword that you want your post to focus on, and then it uses some best practices’ rules to score the SEO performance of your post versus that focused keyword and also score the readability of the post. It also tells you what you did well and what you can improve to make your score better.

Yoast SEO has more than 1 million active installs (as of 2016). The number says it all. I would definitely recommend this plugin, especially if you are new to SEO.

3. Image Teleporter

Developed by Blue Medicine Labs

When you copy the image from another web page to your post editor, the image URL is still from the original host, not your WordPress website’s host. This plugin turns images in your posts that are hosted externally into images that are uploaded to your Media Library.

When you finish editing your post and hit Publish or Update, this plugin finds images that are still hosted externally in your post, downloads them, uploads them to your Media Library, changes the image links of your post to the Media Library version and saves the post again.

By changing the external linked image to your Media Library, your website performance will not be affected by the external host performance. Moreover, if the external host goes down, the images on your posts will still load beautifully.

Imagine the workload you would have to do without this plugin: downloading, uploading, inserting the image for every image in your post, multiplied by the number of posts you have; not to mention the troubles when the external host goes down several years later. Now, while this brilliant plugin is doing all the hard work, you can go out and drink beers with your buddies!

4. Jetpack by WordPress.com

Developed by Automattic

Jetpack provides us with a lot of cool features out of the box. Below are some of those:

  • Photon – free CDN hosting service by Jetpack. Jetpack automatically cache images on our website on their CDN and serve static contents like images on our website to our visitors from their CDN. This feature helps releasing stress to our server, with no cost at all.
  • Site stats: traffic, visitors
  • Infinite scroll: Load more posts as the reader scrolls down
  • Social: Add social sharing buttons to your posts, automatically share your posts to your fan page

There are a lot more waiting to be discover. I would recommend that you give this awesome plugin a try.

5. Page Builder by SiteOrigin

Developed by SiteOrigin
Also install SiteOrigin Widgets Bundle by the same developer.

SiteOrigin Page Builder is the most popular page creation plugin for WordPress. It makes it easy to create responsive column based content, using the widgets you know and love. Your content will accurately adapt to all mobile devices, ensuring your site is mobile-ready. Read more on SiteOrigin.

With SiteOrigin, your editors immediately become professional html designers. All of the layouts, components like google maps, carousel slider, etc. that you can think of, can be done with SiteOrigin using only drag-and-drop. No single line of code or html editing will be necessary.

I would strongly recommend that you install this plugin and give it a try.

6. WP Super Cache

Developed by Automattic

If your website content does not need to be 100% real-time, this plugin can help a lot with your hosting cost, because you can now use only one tenth of your hardware resources to serve the same amount of traffic. Moreover, the settings are pre-configured out of the box. You can install the plugin and just use the default options, yet everything still works perfectly.

This plugin generates static html files from your dynamic WordPress blog. After a html file is generated your webserver will serve that file instead of processing the comparatively heavier and more expensive WordPress PHP scripts.

The static html files will be served to the vast majority of your users, but because a user’s details are displayed in the comment form after they leave a comment those requests are handled by the legacy caching engine. Static files are served to:

  • Users who are not logged in.
  • Users who have not left a comment on your blog.
  • Or users who have not viewed a password protected post.

99% of your visitors will be served static html files. Those users who don’t see the static files will still benefit because they will see different cached files that aren’t quite as efficient but still better than uncached. This plugin will help your server cope with a front page appearance on digg.com or other social networking site.

7. WP Mail SMTP

Developed by Callum Macdonald

Some cloud hosting, including Google Cloud, Amazon Web Services and Microsoft Azure Cloud, won’t let us send emails via SMTP from within the web server. To send emails, we should use some 3rd party email services like SendGrid, MailGun, etc. that allow us to use some custom SMTP port, that can get through the cloud firewall policy.

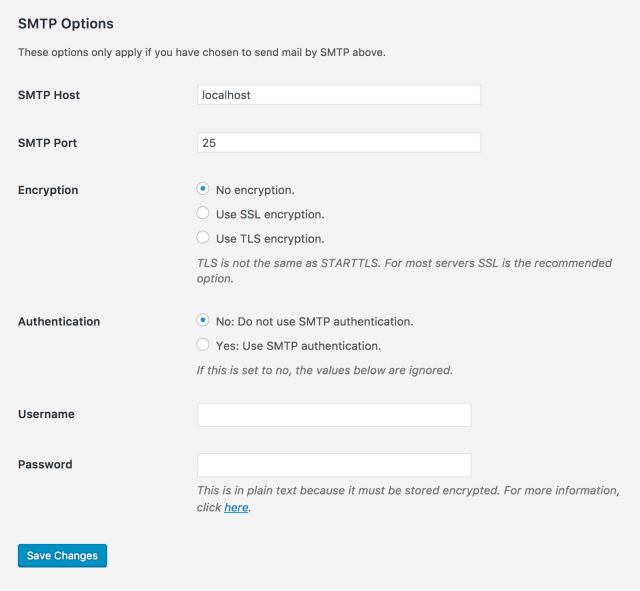
This plugin helps us configure SMTP and also test the configuration easily with only one page of configuration. Without this plugin, configuring SMTP settings and testing them would be a pain, especially if you don’t have ssh access to the hosting server.

The plugin configuration page is so simple that an average user can do it by himself.

8. Contact Form 7

Developed by Takayuki Miyoshi

If you are looking for a contact form for your website, look no more. Contact Form 7 plugin provides a contact form out of the box. It also integrates well with Google’s ReCaptcha service to prevent your websites from spams. The configurations are simple yet very flexible.

If you already have SiteOrigin plugin installed, SiteOrigin also comes with a very powerful contact form in their Page Builder feature. In my opinion, SiteOrigin’s contact form and Contact Form 7 are equally good. It’s only a personal preference matter when it comes to choosing which to use.


Conclusion

In this topic, I have mentioned the plugins that I find useful and install on all of my WordPress websites. Hope they can help you, too!

What are your favorite WordPress plugins? Let me know in the comments! 😀

How to setup multiple WordPress on Ubuntu 16.04

How to setup multiple WordPress on Ubuntu 16.04

Introduction

WordPress is the most popular website framework in the world, powering 30% of the web all around the world. Over 60 million people have chosen WordPress to power the place on the web they call “home”.

In this tutorial, we will demonstrate how to setup multiple WordPress websites on a same Ubuntu 16.04 server. The setup includes nginx, MySQL, PHP, and WordPress itself.

Prerequisites

Before you complete this tutorial, you should have a regular, non-root user account on your server with sudo privileges. You can learn how to set up this type of account by completing DigitalOcean’s Ubuntu 16.04 initial server setup.

Once you have your user available, sign into your server with that username. You are now ready to begin the steps outlined in this guide.

Step 1. Install the Nginx Web Server

Install nginx

$ sudo apt-get update
$ sudo apt-get install nginx

Enable ufw to allow HTTP

$ sudo ufw allow 'Nginx HTTP'

Verify the change

$ sudo ufw status

You should see HTTP traffic allowed in the displayed output:

Output
Status: active

To                         Action      From
--                         ------      ----
OpenSSH                    ALLOW       Anywhere                  
Nginx HTTP                 ALLOW       Anywhere                  
OpenSSH (v6)               ALLOW       Anywhere (v6)             
Nginx HTTP (v6)            ALLOW       Anywhere (v6)

With the new firewall rule added, you can test if the server is up and running by accessing your server’s domain name or public IP address in your web browser.

Navigate your browser to test if nginx is working:

Test Nginx’s default landing page in browser

http://server_domain_or_IP

If you see the above page, you have successfully installed Nginx.

Step 2. Install MySQL to Manage Site Data

Now that we have a web server, we need to install MySQL, a database management system, to store and manage the data for our site.

Install MySQL server

$ sudo apt-get install mysql-server

You will be asked to supply a root (administrative) password for use within the MySQL system.

The MySQL database software is now installed, but its configuration is not exactly complete yet.

To secure the installation, we can run a simple security script that will ask whether we want to modify some insecure defaults. Begin the script by typing:

Secure MySQL installation

$ sudo mysql_secure_installation

You will be asked to enter the password you set for the MySQL root account. Next, you will be asked if you want to configure the VALIDATE PASSWORD PLUGIN.

Warning: Enabling this feature is something of a judgment call. If enabled, passwords which don’t match the specified criteria will be rejected by MySQL with an error. This will cause issues if you use a weak password in conjunction with software which automatically configures MySQL user credentials, such as the Ubuntu packages for phpMyAdmin. It is safe to leave validation disabled, but you should always use strong, unique passwords for database credentials.

Answer y for yes, or anything else to continue without enabling.

VALIDATE PASSWORD PLUGIN can be used to test passwords
and improve security. It checks the strength of password
and allows the users to set only those passwords which are
secure enough. Would you like to setup VALIDATE PASSWORD plugin?

Press y|Y for Yes, any other key for No:

If you’ve enabled validation, you’ll be asked to select a level of password validation. Keep in mind that if you enter 2, for the strongest level, you will receive errors when attempting to set any password which does not contain numbers, upper and lowercase letters, and special characters, or which is based on common dictionary words.

There are three levels of password validation policy:

LOW    Length >= 8
MEDIUM Length >= 8, numeric, mixed case, and special characters
STRONG Length >= 8, numeric, mixed case, special characters and dictionary file

Please enter 0 = LOW, 1 = MEDIUM and 2 = STRONG: 1

If you enabled password validation, you’ll be shown a password strength for the existing root password, and asked you if you want to change that password. If you are happy with your current password, enter n for “no” at the prompt:

Using existing password for root.

Estimated strength of the password: 100
Change the password for root ? ((Press y|Y for Yes, any other key for No) : n

For the rest of the questions, you should press Y and hit the Enter key at each prompt. This will remove some anonymous users and the test database, disable remote root logins, and load these new rules so that MySQL immediately respects the changes we have made.

At this point, your database system is now set up and we can move on.

Step 3. Install PHP for Processing

We now have Nginx installed to serve our pages and MySQL installed to store and manage our data. However, we still don’t have anything that can generate dynamic content. We can use PHP for this.

Since Nginx does not contain native PHP processing like some other web servers, we will need to install php-fpm, which stands for “fastCGI process manager”. We will tell Nginx to pass PHP requests to this software for processing.

We can install this module and will also grab an additional helper package that will allow PHP to communicate with our database backend. The installation will pull in the necessary PHP core files. Do this by typing:

Install php-fpm and php-mysql

$ sudo apt-get install php-fpm php-mysql

Configure the PHP Processor

We now have our PHP components installed, but we need to make a slight configuration change to make our setup more secure.

Open the main php-fpm configuration file with root privileges:

$ sudo nano /etc/php/7.0/fpm/php.ini

What we are looking for in this file is the parameter that sets cgi.fix_pathinfo. This will be commented out with a semi-colon (;) and set to “1” by default.

This is an extremely insecure setting because it tells PHP to attempt to execute the closest file it can find if the requested PHP file cannot be found. This basically would allow users to craft PHP requests in a way that would allow them to execute scripts that they shouldn’t be allowed to execute.

We will change both of these conditions by uncommenting the line and setting it to “0” like this:

Change cgi.fix_pathinfo

# /etc/php/7.0/fpm/php.ini

cgi.fix_pathinfo=0

Save and close the file when you are finished.

Now, we just need to restart our PHP processor by typing:

Restart PHP processor

$ sudo systemctl restart php7.0-fpm

This will implement the change that we made.

Step 4. Install WordPress

The plan

To make the best use of the server, we will setup the server so that we can also host other websites in PHP or Python in the future. To do that, we will have the following arrangement:

  • Websites’ source code will stay in
    /www/hexadix.com/
    /www/example.com/
  • Each website configuration will be saved in
    /etc/nginx/sites-enabled/hexadix.com.conf
    /etc/nginx/sites-enabled/example.com.conf
  • The full configuration for each website will be in the above mentioned file. The default nginx configuration file will be removed.
  • /www folder will be chown to nginx’s user

    By default, nginx will run as www-data or nginx, you can find this out by running ps aux | grep nginx in your terminal)

Using this arrangement, we can freely add future websites in such manner so everything is kept organized.

Step 4.1. Create database for your WordPress

Login to MySQL shell

$ mysql -u root -p

Create database and mysql user for our WordPress

mysql> CREATE DATABASE wordpress CHARACTER SET utf8 COLLATE utf8_unicode_ci;
mysql> CREATE USER 'wpuser'@'localhost' IDENTIFIED BY 'wppassword';
mysql> GRANT ALL PRIVILEGES ON wordpress.* TO 'wpuser'@'localhost';
mysql> FLUSH PRIVILEGES;
mysql> SHOW GRANTS FOR 'wpuser'@'localhost';

A common practice here is to use website name as database name, and also as database user name. This way, each database user will have access to only its database, and the naming convention is easy to remember.

Step 4.2. Setup WordPress folder

Change directory to /www

$ cd /www

Download the latest WordPress.

$ wget http://wordpress.org/latest.tar.gz

Extract it.

$ tar -zxvf latest.tar.gz

Move it to our document root.

$ mv wordpress/* /www/hexadix.com

Copy the wp-sample-config.php file and make it as wp-config.php file.

$ cp /www/hexadix.com/wp-config-sample.php /www/hexadix.com/wp-config.php

Edit the config file and mention the database information.

$ vi /www/hexadix.com/wp-config.php

Default will look like below.

# /www/hexadix.com/wp-config.php

// ** MySQL settings – You can get this info from your web host ** //
/** The name of the database for WordPress */
define('DB_NAME', 'database_name_here');
/** MySQL database username */
define('DB_USER', 'username_here');
/** MySQL database password */
define('DB_PASSWORD', 'password_here');
/** MySQL hostname */
define('DB_HOST', 'localhost');

Modified entries according to the created database user and database will look like.

# /www/hexadix.com/wp-config.php

// ** MySQL settings – You can get this info from your web host ** //
/** The name of the database for WordPress */
define('DB_NAME', 'wordpress');
/** MySQL database username */
define('DB_USER', 'wpuser');
/** MySQL database password */
define('DB_PASSWORD', 'wppassword');
/** MySQL hostname */
define('DB_HOST', 'localhost');

Make nginx user as the owner to WordPress directory.

$ chown -R www-data:www-data /www/hexadix.com/

Step 4.3. Configure nginx

Open nginx main configuration file

$ sudo vi /etc/nginx/nginx.conf

Look for the line below.

include /etc/nginx/sites-enabled/*;

Change it to

include /etc/nginx/sites-enabled/*.conf;

The purpose of this step is to tell nginx to only load files with .conf extension. This way, whenever we want to disable a website, we only need to change the extension of that website’s configuration file to something else, which is more convenient.

Test new nginx configuration

$ sudo nginx -t

Reload nginx

$ sudo systemctl reload nginx

If everything works correctly, when you navigate your browser to your website now, the default Welcome to Nginx page would have been disabled.

Create nginx configuration file for our WordPress

$ sudo vi /etc/nginx/sites-enabled/hexadix.com.conf

Put the following content in the file

server {
  listen 80;
  server_name hexadix.com www.hexadix.com;
  root /www/hexadix.com;
  index index.php index.html index.htm;

  if (!-e $request_filename) {
    rewrite /wp-admin$ $scheme://$host$uri/ permanent;
    rewrite ^/[_0-9a-zA-Z-]+(/wp-.*) $1 last;
    rewrite ^/[_0-9a-zA-Z-]+(/.*\.php)$ $1 last;
  }
  location / {
    try_files $uri $uri/ /index.php?$args;
  }
  location ~ \.php$ {
    try_files $uri $uri/ /index.php?q=$uri&$args;
    fastcgi_pass unix:/var/run/php/php7.0-fpm.sock;
    fastcgi_index index.php;
    fastcgi_param SCRIPT_FILENAME $document_root$fastcgi_script_name;
    include fastcgi_params;
  }
}

Remember to change the server_name and root to match your website. Also, the fastcgi_pass path may differ in your server installation.

Test new nginx configuration

$ sudo nginx -t

Reload nginx

$ sudo systemctl reload nginx

If everything works correctly, by this time you can navigate to your domain (in this case http://hexadix.com) and see your WordPress Installation Wizard page. Follow the instruction on the Wizard to setup an admin account and you’re done.

You can now login to your WordPress administrator site by navigating to:

http://yourdomain.com/wp-admin/

Your front page is at:

http://yourdomain.com

Setup multiple WordPress

To setup another WordPress on the same server, repeat the whole Step 4 in the same manner with the corresponding configurations.

Conclusion

You should now have multiple WordPress websites on your Ubuntu 16.04. Now you can setup as many additional websites as you may need by following the same steps in the tutorial.

How to type math notations using LaTex syntax in your WordPress

How to type math notations using LaTex syntax in your WordPress

Method #1: Jetpack’s LaTex render plugin (not recommended)

If you have Jetpack by WordPress.com plugin installed and activated in your WordPress, the good news is Jetpack comes with a LaTex rendering function out of the box.

To use this function, first ensure that you have enabled it in Jetpack’s settings.

 
Now you can go to your blog post and insert the following code:

$latex i\hbar\frac{\partial}{\partial t}\left|\Psi(t)\right>=H\left|\Psi(t)\right>$

 
Jetpack will render the code into an image on their server and embed it to your blog like below:
i\hbar\frac{\partial}{\partial t}\left|\Psi(t)\right>=H\left|\Psi(t)\right>
 
Notice that the above Math notations are actually rendered as an image.

While Jetpack’s solution above works, it does have some drawbacks:

  • Since the notations are rendered into an image, it does not scale well with the container size. The math notations may appear too small or too blurry.
  • Search engines may not be able to read the notations.

Considering the above drawbacks, we recommend another way to type math notations in your WordPress.

Method #2: MathJax library (recommended)

MathJax is a Javascript library that reads LaTex syntax and turns it into beautiful math notations.

Compare to the above method, MathJax has some advantages:

  • MathJax can render math notations in several formats, including HTML, MathML, SVG
  • Rendered notations can scale well with container size (thanks the above formats)
  • Maybe more SEO friendly (though we’re not 100% sure)
  • More accessibility compatible

For more information, we recommend you to visit MathJax official page.

Using MathJax, the above Jetpack’s example can be rewritten as following:

$$i\hbar \frac{\partial}{\partial t} \left| \Psi(t) \right> = H \left| \Psi(t) \right> $$

and here’s the result:
$$i\hbar \frac{\partial}{\partial t} \left| \Psi(t) \right> = H \left| \Psi(t) \right> $$

How to use

To use MathJax in your web page, simply include their javascript in the page’s html.

<script src='https://cdn.mathjax.org/mathjax/latest/MathJax.js?config=TeX-AMS-MML_HTMLorMML'>

If you are using WordPress and want to include the above script, you can use Insert Headers and Footers plugin and paste the script in the plugin’s setting.

After the script is included, all the LaTex you type will turn into beautiful math notations effortlessly.

Examples

Example #1

When \(a \ne 0\), there are two solutions to \(ax^2 + bx + c = 0\) and they are
$$x = {-b \pm \sqrt{b^2-4ac} \over 2a}.$$

will output:
When \(a \ne 0\), there are two solutions to \(ax^2 + bx + c = 0\) and they are
$$x = {-b \pm \sqrt{b^2-4ac} \over 2a}.$$

Notice that using \( ... \) results in inline LaTex block, while using $$ ... $$ results in LaTex block in a separate line.

Example #2

\[
\left\{
\begin{split}
    & \boldsymbol{\nabla} \cdot \boldsymbol{E} = \frac{\rho}{\varepsilon_0} \\
    & \boldsymbol{\nabla} \cdot \boldsymbol{B} = 0 \\
    & \boldsymbol{\nabla} \times \boldsymbol{E} = - \frac{\partial \boldsymbol{B}}{\partial t} \\
    & \boldsymbol{\nabla} \times \boldsymbol{B} = \mu_0 \boldsymbol{J} + \varepsilon_0 \mu_0 \frac{\partial \boldsymbol{E}}{\partial t}
\end{split}
\right.
\]

will output:
\[
\left\{
\begin{split}
& \boldsymbol{\nabla} \cdot \boldsymbol{E} = \frac{\rho}{\varepsilon_0} \\
& \boldsymbol{\nabla} \cdot \boldsymbol{B} = 0 \\
& \boldsymbol{\nabla} \times \boldsymbol{E} = – \frac{\partial \boldsymbol{B}}{\partial t} \\
& \boldsymbol{\nabla} \times \boldsymbol{B} = \mu_0 \boldsymbol{J} + \varepsilon_0 \mu_0 \frac{\partial \boldsymbol{E}}{\partial t}
\end{split}
\right.
\]

Bonus

By this time, you may have already wondered, what if you want to show the plain original LaTex code instead of the converted math notations, like the LaTex codes pasted in the above examples?
The answer is simpler than expected: just put the LaTex code nested inside a <pre> </pre> tag. MathJax is smart enough to skip anything that is nested inside <pre> </pre>.

Now, if you want that original LaTex codes beautifully highlighted, you may want to check Google’s code-prettify library. But that’s another story :D.